Showing posts with label DIY. Show all posts

{DIY} Ruffled Ombre Wedding Card Box

These are the first set of photos I've posted since switching to a Mac, so pardon the bad lighting in the photos. I used to use Photoshop to clean them up, but for this post I just used the editing functions on the Mac and I clearly have no idea what I'm doing.

Once all the bridal shower craziness was done with, I got to working on the wedding card box and table assignments for Michelle and Allen's wedding.

This was such a labour of love. It took me way longer than I expected but I loved it in the end. And now it'll just sit in Michelle's closet until it collects too much dust and will need to be thrown out!


My inspiration came from this wedding featured on Style Me Pretty with the cake by Cake Coquette.


For the ombre effect I was able to find two different shades of coral/pink streamers that worked well together and I picked up white as well. The other supplies I used included two recycled boxes (plus some cardboard pieces to lift the lid of the green box higher, otherwise the base of the "cake" would be really short), white glue, a glue gun, white spray paint (so the green and brown would be less noticeable under the streamers), and a sewing machine.


I thought I took pictures of the boxes with the hole cut in the green lid and everything pieced together, but apparently I failed to do so.

I'll have you know, I had not touched a sewing machine since the 8th grade where one of our projects was to sew a pair of boxer shorts. I never even finished mine because the school year ended halfway through my shorts so my mom finished sewing them. Basically I have no skills with a sewing machine.

I started sewing as centered as I could down the streamers. I did the dark coral first and the white last, but I wish I had done it in the opposite order because the dark coral streamers were much more delicate than the white ones. Starting with the thicker streamers would've been better to ease back into sewing!


This is how I kept the streamers as I was sewing - chopstick right in the middle of the roll of streamers and then placed in the well of the sewing machine's lid. It was a lot easier as the streamers then wouldn't get tangled as I was sewing.


For the most part I was able to stay centered, but after a while I would daydream and the stitches would get reeeeaaaally close to the edge.


First roll of 4 done! To make the ruffles I just held onto one thread (the bottom stitch) and pulled the streamers down with the second (top) thread. This took waaaay too long, but watching TV while you're doing it helps. I've seen instructions for making ruffled streamers where you set the tension high and something or other so that it'll ruffle as you sew, but that was method was way too complicated for me.


Bottom layers are done!


I just put a line of white glue and glued the top half of the streamers down.


After a million years of sewing and ruffling, gluing was a piece of cake! (Pun not intended). I even made roses out of the streamers to dress it up a bit.


I hadn't thought about the placement of the card slot until I had to glue the streamers down and this was the best I could come up with. It might've been better to put the card slot on the side of the box because you had to shake the box every so often when people were putting cards in because they would stay standing up instead of laying flat at the bottom.


I maybe should have put more light pink layers at the base of the top tier... This looks more like colour blocking than ombre.


Below is a little photo heavy with the details.


So if you're wondering what I did during my summer, this took up a good 3 weeks of it (at least)!

Total cost? Maybe $10, if even? Mainly for the streamers and spray paint (which I plan to use for other stuff). Since I had the boxes, I didn't have to buy any from the dollar store, otherwise it'd be $20 maybe? (Large boxes were around $6.)

It was easy enough to get the cards out too as I didn't glue the box closed. The green lid came off as usual, which just meant when carrying it you had to carry it from the bottom.

And for the table assignments, I turned two of these framed posters:


Into this:


I just found some wrapping paper at Hallmark and used black pens and sharpies to do the table numbers and guests. Easy peasy!
(Actually, not too easy taking the frame apart since it was meant to just buy and hang. The backing was not removeable to I had to be careful peeling the backing off and taking the photo mat out.)

Anyways, the wedding turned out great! We weren't as hurried as I expected for the tea ceremony or bridal party photos, but everything after the wedding ceremony is a complete blur! I honestly have no idea what happened during the reception...

{I Heart} Girls' NYC Weekend Blurb

For a while now I've wanted to get some photo books printed of the various trips I've taken instead of developing individual photos and getting massive photo albums for them. I love seeing full bookshelves and having organized photo books on them would be just lovely!

So when I won Kait's Blurb Giveaway right before our girls' trip to New York (seen here and here), I figured it'd be the perfect test trip since I was going to print multiples and I could see how both softcover and hardcover were. I don't think it made much of a difference (only a few bucks), but I Googled for a coupon code as well (I think I found 20% off) and placed 2 separate orders since Blurb only allows for one promo code to be used per order.

On the left, the ImageWrap hardcover and the softcover on the right. I chose the Standard Landscape size (10 x 8 inches).

Sadly I'm not made of money so the bride-to-be and I got the hardcovers with premium paper (in lustre finish) while the others got the softcovers with standard paper. Only softcovers with over 80 pages can have text on the spine and I made them to be 60 pages, hence the lack of text on the top two copies.


Inside!

The photos are a bit grainy so I think I need to use a higher resolution on my camera if I plan to make more of these books.(Though I'm not sure if it's because of my camera settings or the printer...)

For the most part, I had a ball of a time playing with the pre-set layouts as well as creating some of my own.

I like that you can cram as many photos as you want on a page, without having to pay for each individual print if you were to develop them normally.

Next time I need to scrutinize every photo edge though. I found a few of these slight gaps throughout the book.

I even listed the things we ordered at Marea, otherwise we will never remember what we ate despite having all those photos.

Mandie's a rebel and uses Hipstamatic instead of Instagram, but I picked my fave ones from her photos and put them chronologically across two pages.

On the back cover I listed our itinerary and put the photo I took of the map of Central Park. 
No matter how many times I refer to this map, I always take the wrong path! (And I don't mean just on this trip.) Oh well. We still got to where we wanted to go, we just took a bit of a detour.

I was pretty impressed with the packaging! Those babies did not budge in the box at all.

I was really impressed with the speed! I submitted my orders on the Friday before the Canada Day long weekend and had the books in my hands 10 days later! I thought it would take at least 3 weeks! The quality of the books were great as well, though after reading through the forums I'm not sure if the graininess of the photos were due to my photo resolutions or the Canadian printers.

I definitely want to make more books and have a neat little collection, but I take forever to sort through photos, let alone formatting them in the different layouts.

Have any of you started a collection of photo books?

{DIY} Lowboy Dresser

I thought it took me a long time to finish the tall boy, but doing the lowboy only took a month less to do.

Here's a reminder of what the tall boy looks like now:

And here's the lowboy while it was in the basement guest room:


If you look at the first picture, you might notice that the mirror frame and dresser are different colours. That's because my dad made the frame for the mirror and attached it himself. I guess that's where I inherited my curiosity for DIYs eh?

Here's my dad removing the mirror so that I could paint the dresser.

After 3-4 coats of Swan Wing by Behr,  here's the lowboy!


I actually used a roller for two of the larger drawers because the brush kept getting too streaky and I didn't want 6 layers of paint on it. I used a paint brush for the rest of the lowboy so in person, if you look closely, it's a little mismatched but it doesn't bother me too much (at the moment).

I wanted to use Floetrol for the dressers so that the paint would be more fluid and less likely to be streaky, but this one man at Home Depot told me not to and has since given me bad advice another two times! Because I regretted not getting Floetrol the first time, I didn't listen to him the other two times though. I really should learn to find someone else, but it seems like every time I go to that location, he's the only one around the paint department!


The lowboy is shinier than the tall boy because I used a small foam brush to cover it in 2 thin coats of Minwax polycrylic but since it dries so fast, it's a bit streaky on top as well. Again, this doesn't bother me so much right now as it's only noticeable in certain angles of light.

What DOES bother me is the little fibres and dust particles that landed while the paint and polycrylic were drying, but I'll live with it since I'm not going to ruin it by trying to sand out those bits. I already accidentally scraped off a bit of paint trying to get one little fibre off and painting over it looked worse.


I used the same black spray paint as well, but it came out a lot grittier. It's supposed to be satin, but it seems more matte. Maybe I just didn't shake the can enough?

Two dressers done and one more to go (my old one which will go into the guest room), but I'm going to apply some polycrylic to the tall boy as well. I've been too scared to put anything on top of it. I put a vase on it for one day and I felt like it was starting to damage the paint so I've only been putting light things on it. I'll probably add another coat on the top of the lowboy while I'm at it too, just to get 'er all done at once.

Now that I've finally painted this, I can finally organize my closets again. They're a bit chaotic at the moment...

Linked to: Primitive & Proper

{At Home} Powder Room Update & Lighting

Whoops. Totally dropped the ball on this one again! Just a little update on the powder room progress (and current lack thereof).

We last left off here with the sink bowl on the kitchen table and the old light fixture.


Instructions. All gibberish to me!

As a reminder, here's the old screechy faucet.

My dad's makeshift set-up to hook all the plumbing back together...

And now the sink is all put back together after some minor cosmetic alterations!

Shiny!

And not screechy at all! I still cringe every now and again when I turn the tap on, expecting it to scream at me.

After this was installed, every time I walked by the powder room I would walk in just to stare lol.

So we crossed off one more item on the to-do list...
  • Paint stripes on the walls
  • Paint the baseboards
  • Replace the toilet
  • Re-hang old mirror
  • Finish installing the new faucet and reattach the sink bowl to the wall
  • Touch up the paint around the sink (Miraculously, it needed no touch ups!)
  • Buy a new light fixture and install
  • Find two pieces to fill the frames and hang them up (I've got one potential, I just need a second)
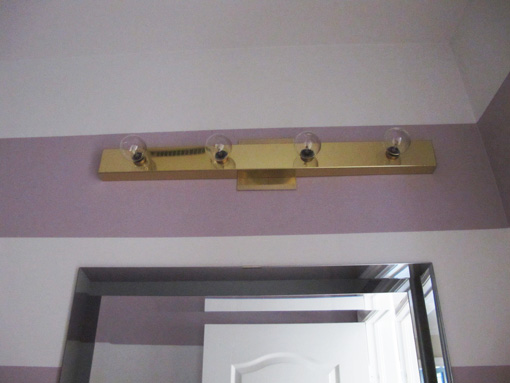
The light fixture is still this 80's style Hollywood bulb type. We just haven't found any light fixtures that catch our eye (and don't break the bank) as you can tell by all the other light fixtures in the house...

The master bathroom had a boob light that we removed back in February and it still looks like this...

Gotta love the builder's standard light fixture...

We bought this Martha Stewart fixture (Seal Harbor) to see if we liked it so then we would buy the 1- or 2-light version for the powder room. So far so good, though we have 60 watt bulbs in them now and it gets really warm standing under them even after 10 seconds. I keep meaning to switch to a lower wattage but again, hello, I am lazy.

I'll eventually post about the updates made to this bathroom (and all other rooms...).

So last year I switched out the overhead light in my bedroom and it made a world of difference! Below is the standard builder one from over 20 years ago!
Yuck. This is the one currently in my brother's room. We've yet to decide what to switch his out for.

I switched the standard to this Hampton Bay one, I believe it was $30? After about 2 weeks, I realized that the wallmount lights in the basement are the semi-circles version of this! I'm not sure my parents have even realized yet.

We originally bought this light for the spare bedroom upstairs (now turned "library" and my second closet), but somehow it ended up in the master walk-in closet instead.

And so the light in the spare room looks like this now. Also since February...

I suppose I should start keeping an eye out again for light fixtures and just get 'er done! I just want to finish all the bedroom/bathroom stuff so that I can get started on the family room and kitchen!

Is anyone else as bad as me with all the jumping around with projects? I seriously cannot focus to get them done in a reasonable amount of time...